 Nomid
Use Tenant View to administer tenant companies and access, consult indicators, configure roles and switch company context. A tenant groups companies in an administrative area.
This manual covers using Tenant View and switching companies. For additional Portal navigation guidance, see Login, menu and help.
Before switching company, finish your work and check for an active Classroom mode session. Switching waits for the closure request; check the result before continuing.
Switch companies from a company workspace
Open the profile menu and select Switch company. In the selector, search by company or tenant name and check the group before choosing. Select the required company, wait for loading, and check the destination name and context in the profile before continuing your work. Selecting the already active company keeps that context. The precautions for work in progress and Classroom mode described below also apply to this switch.
Before changing context
Sign in to the Portal with your authorized account. Tenant View availability depends on the feature being enabled and the administrative access assigned to your account for the selected tenant. Access to a company alone does not establish access to Tenant View.
Finish your work and check for an active Classroom mode session before changing context. Navigation to Tenant View requests closure of that session, and switching to another company waits for the closure request. See Classroom mode for session controls.
Enter Tenant View
Open the profile menu and select Switch to tenant to open Tenant View. When your account has one available tenant, the option opens its view directly. When several options are available, select the required tenant in the selection panel. Search in this panel filters the available tenant names.
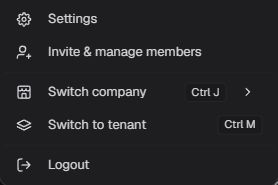
Switch to tenant option in the profile menu for opening Tenant View.
After entering, check the name shown in the profile and the tenant context indication in the menu. This identifies tenant administration separately from a company workspace.
If the option is missing, ask an administrator to check your account access and feature availability. A role name alone does not guarantee that the shortcut is available.
Find a company
In the Tenant View sidebar, locate the Companies group. If it is collapsed, expand it to see the available names. Find the company by its displayed name and select it.
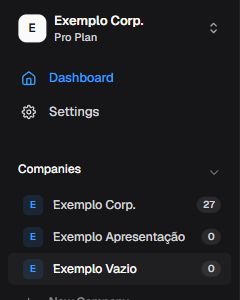
Available companies in the Tenant View sidebar Companies group.
Selecting a company in this group opens its profile within Tenant View. Check the name in the profile to identify the company you are consulting. To move into its operational workspace, use the context switch below.
Enter a company workspace
In Tenant View, open the profile menu and select Switch to company. In the panel, search by company name or tenant name. Results are grouped by tenant. Check both the group and the company name before selecting.
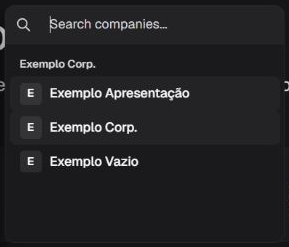
Company selector with search and results grouped by tenant.
When you select another company, wait for the Portal to load the destination workspace. Then check the company name and company context indication in the profile before continuing. When you select the company already associated with the session, the Portal returns to its workspace.
Switching changes the context of the pages and actions you open next. Check the access and features offered in the destination company. A context switch is not a command to apply a policy or change a device.
Check the result and return
After navigation, open the profile and check the company name and company context indication. Do this before administering users, policies or devices. If the context does not match your selection, stop the task and check the session.
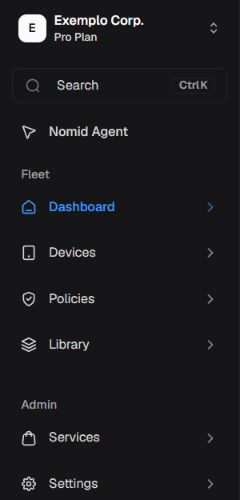
Company identification and navigation in the destination context.
To return to Tenant View from company context, open the profile and select Switch to tenant. If several tenants are available, select the required one. Within Tenant View, the option to switch tenant appears when multiple tenants are available. Check the identification after each change.
Signing out ends session access and opens login. To continue in the same session and work in another company, use context switching.
Use the tenant Dashboard
Open Dashboard in the sidebar. Check the active tenant before comparing companies. Cards summarize enabled companies and the devices counted by the service. Each company's user count represents its direct access memberships. Review the license and status shown in its row to understand that context.
The four cards answer different questions. Total Devices shows the devices counted across the company set. Managed Companies shows how many companies enter the summary. Active Devices shows the number classified as active by the service. Enrollment Rate presents the proportion of those active devices to the total, rounded to a percentage. Check the context and displayed data before using these figures to decide.
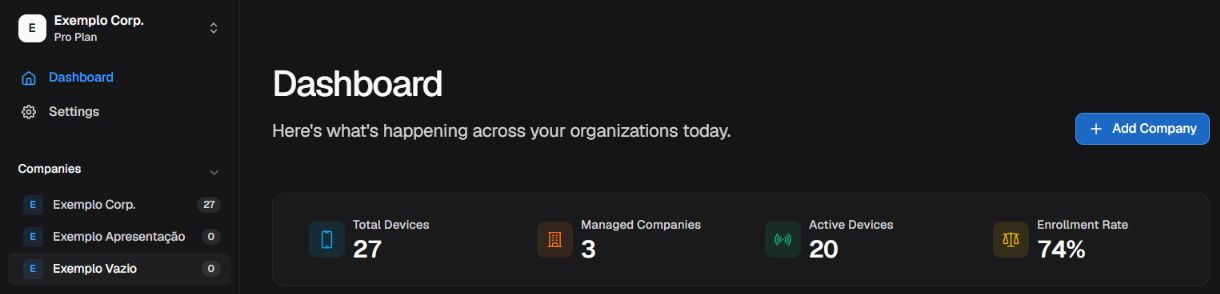
Dashboard indicators for consulting the tenant company set.
For Enrollment Timeline and Devices by Status, check the displayed title, legend and dates.
Enrollment Timeline groups devices by their recorded last-update date within this tenant’s enabled companies. It includes active, provisioning, disabled and external devices from the start of the day 30 days ago in São Paulo time. Each device is counted on its last-update date; another sync can change this distribution. These values represent neither new enrollments nor the number of update events on each day.
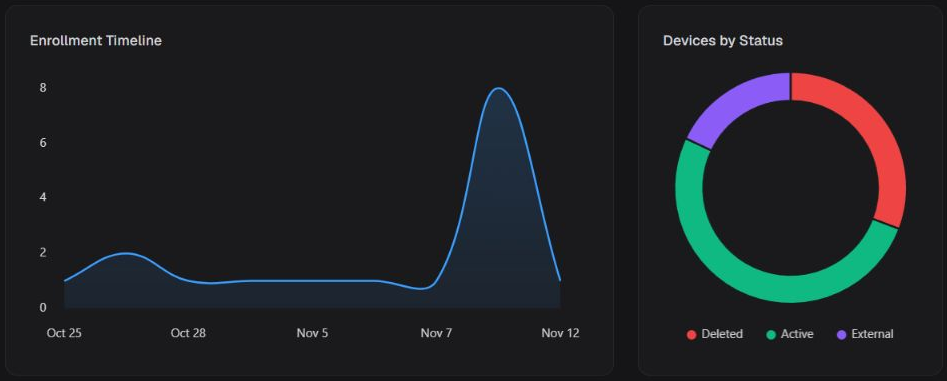
Enrollment Timeline and Devices by Status charts on Dashboard.
Use Companies Overview to compare company, devices, users, license and status. Clicking a sortable heading changes the display order; selecting a company or View Details opens its profile within Tenant View.
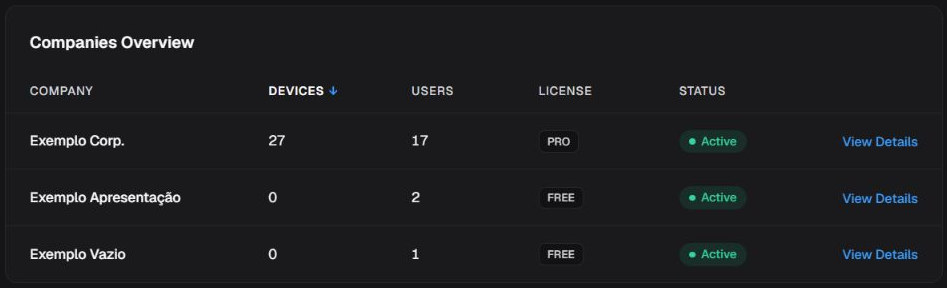
Companies Overview table for comparing companies and opening their details.
If loading fails, wait for the message before treating empty figures as an absence of companies or devices. The upper list highlights up to five companies by device count.
Consult a company profile
Select a company from the sidebar Companies group or the Dashboard table. Check its name in the profile. Overview presents company information and the Edit Company button to edit its details. The devices and users tabs let you inspect each group without switching the session to the company's operational workspace.
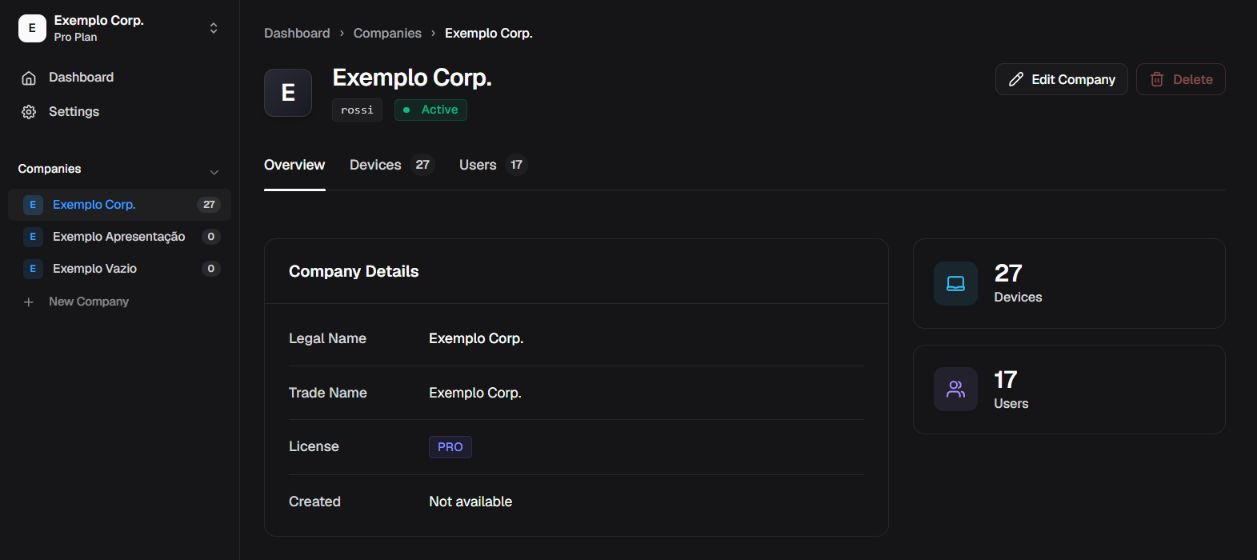
Overview for checking company details.
On the devices tab, use search and the status filter to narrow the loaded list. Search can match name, identifier, policy, model, manufacturer, serial number and operating system version returned by the service. Clearing search or changing the filter only changes the view. When the table exceeds the available width, scroll horizontally to consult the other columns of the same row. Page controls appear only when there is more than one page; when available, check other pages and repeat the search as needed. The captured example contains 27 rows and shows no pagination.
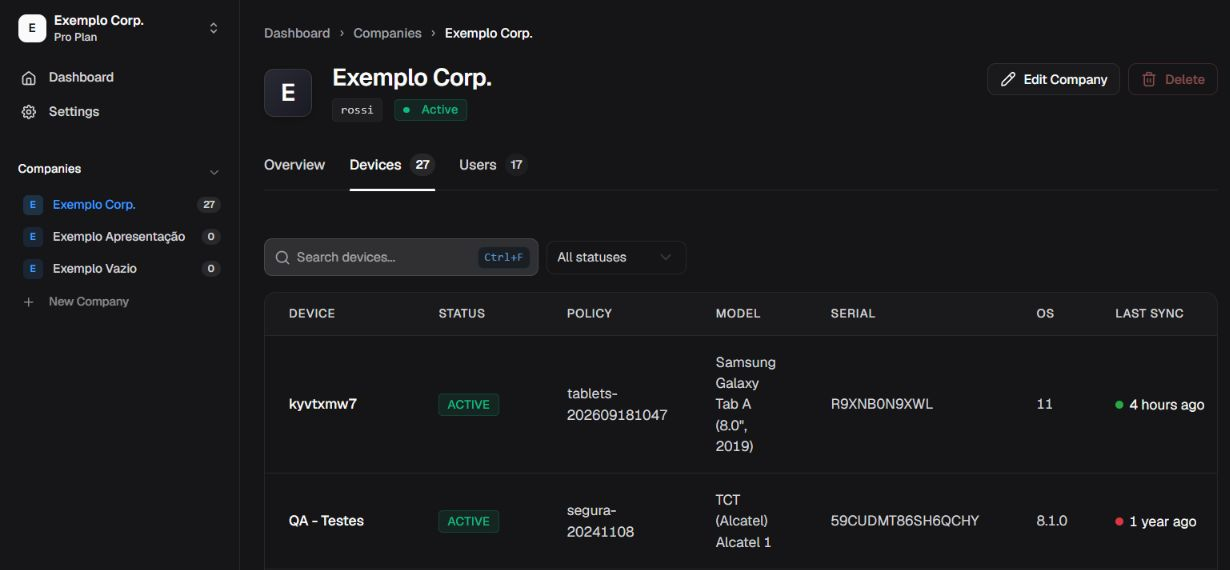
First device rows: identification and status on the left of the table.
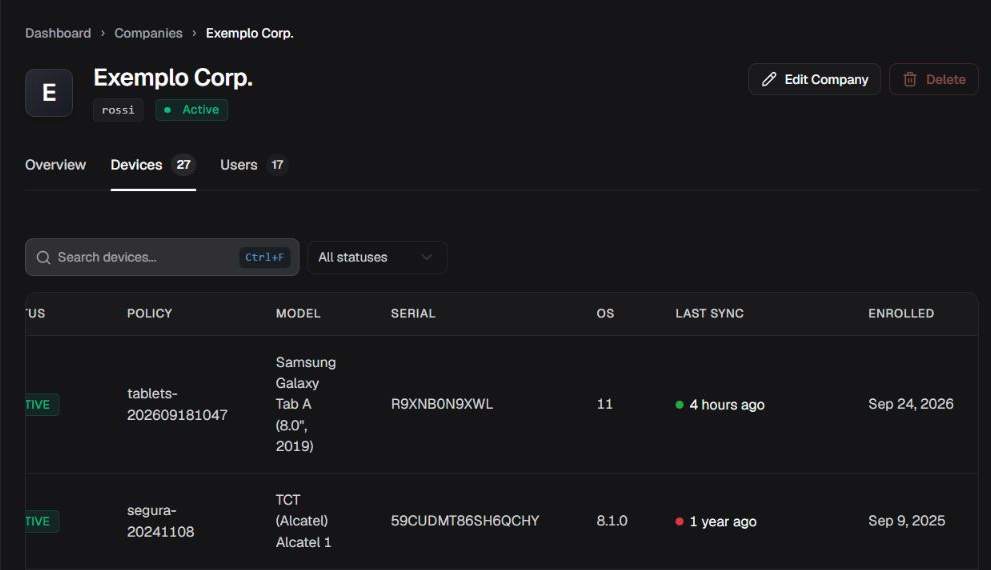
The same rows after scrolling right, with policy, model, serial, OS and dates; identification is outside this view.
On the users tab, search by name or identifier. Check both the user and company before opening a change form.
If the users table exceeds the available width, scroll horizontally to consult the columns of the same row. Check the identity before using role or action controls. The two views below show the same first two rows, not the whole table.
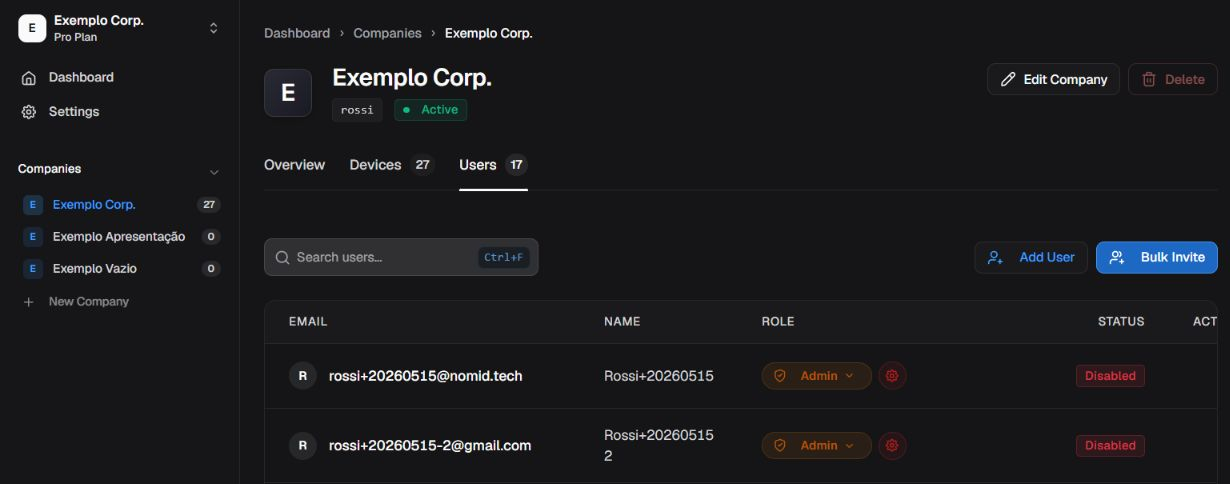
First user rows: identification and access on the left of the table.
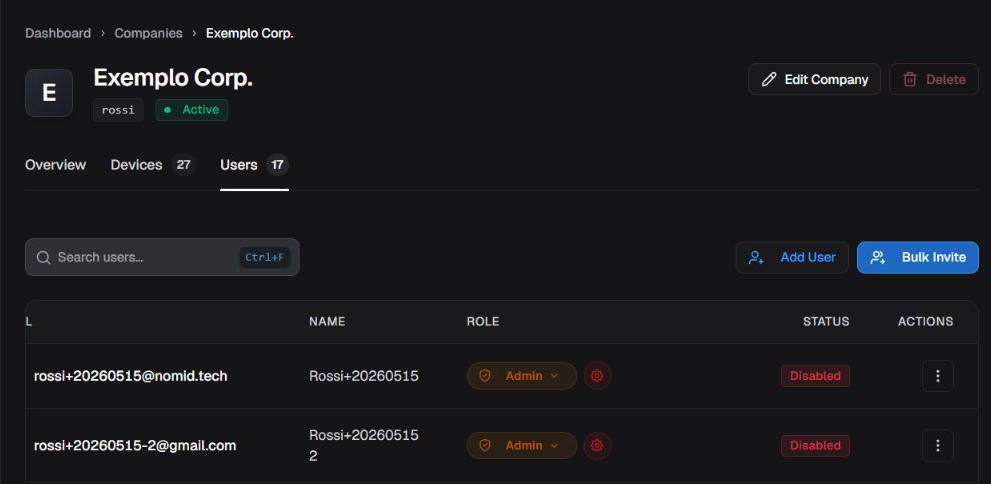
The same user rows after scrolling right to consult roles and actions.
Create or edit a company
The identifier (slug) identifies the company in Portal paths; it differs from legal and trade names. Use up to 20 lowercase letters, digits and hyphens, starting and ending with a letter or digit. It cannot be changed when editing. Legal and trade names accept up to 120 characters; select the country. Locale sets the company language preference: a new user without an explicitly supplied language inherits it. Timezone sets the company time reference and is also inherited when creating users. Currency sets the company monetary unit; the service uses it when selecting upgrade contract prices. These preferences are not device language or clock commands. Saving them does not establish that existing users inherit the changes retroactively.
On Dashboard, select Add Company. Review country, legal name, trade name, identifier and the regional options offered. To edit from the profile, select Edit Company and check the existing values before preparing changes. Filling the form prepares unsaved changes. The final create or save action sends the change; cancel abandons the unsaved changes.
After saving, check the confirmation and consult the company record. If an error occurs, read the field or form message and check whether the operation completed before retrying. Before deleting a company, check the destination and its specific confirmation. The service prevents deletion when devices are counted for that company. Do not remove devices merely to bypass that restriction.
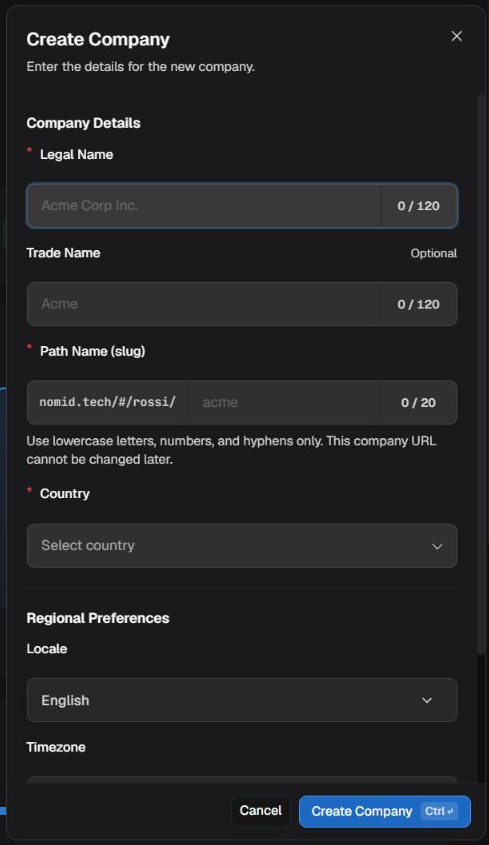
Create Company: identification and regional preferences.
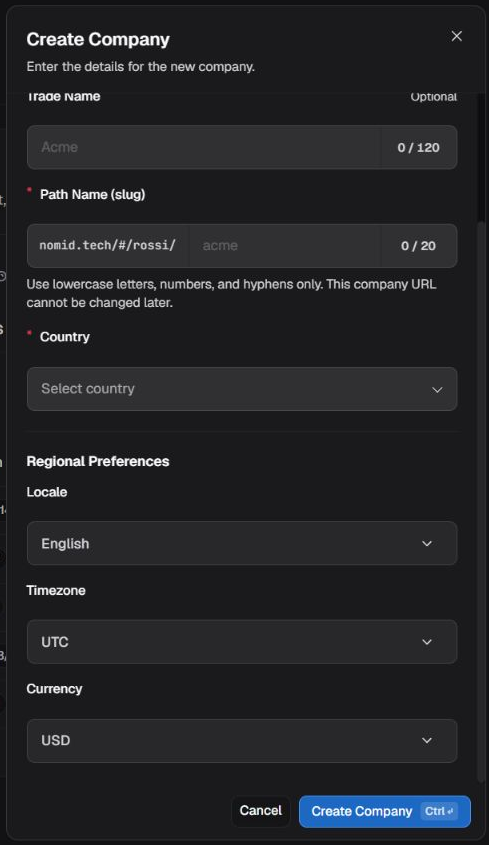
Continuation of Create Company with regional preferences and form actions.
Add users to a company
For a company, Admin includes user and settings management. Editor supports device, policy and library operations without all administrative rights. Analyst focuses on viewing and reporting. Teacher supports authorized classroom operations, including device commands, without full company management. No access grants no set of rights. Custom roles may have organization-defined names; check their permissions before assigning them.
On the company profile's users tab, select Add User. Enter email and name, check language and role, and review the invitation option. Saving requests the company user record. When invitation sending is enabled, the email request follows creation. If the invitation fails, the user may already exist; find the user before repeating.
For several users, select Bulk Invite. Enter email addresses and review invalid entries before continuing. The review step prepares names and addresses and lets you remove an unsaved row or return to preparation. Advancing to review does not create users yet. Final confirmation requests creation and may partially succeed. Check each row's result and invitation status.
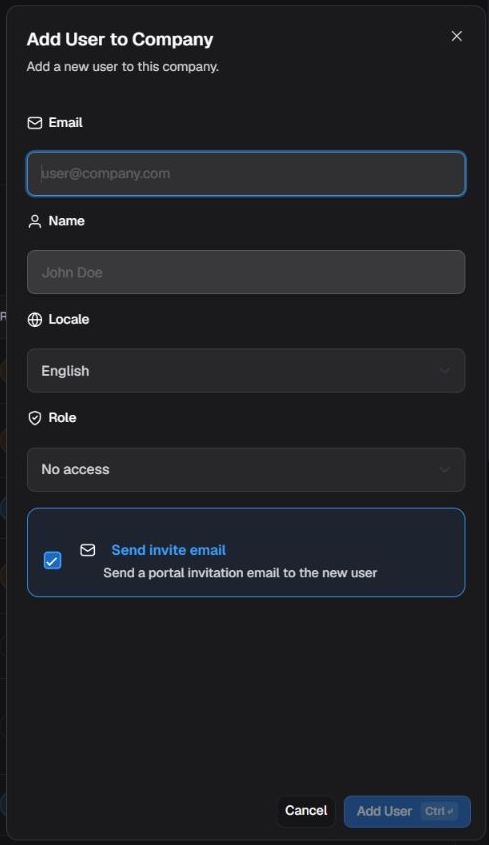
Add User to Company with identification, role and invitation option.
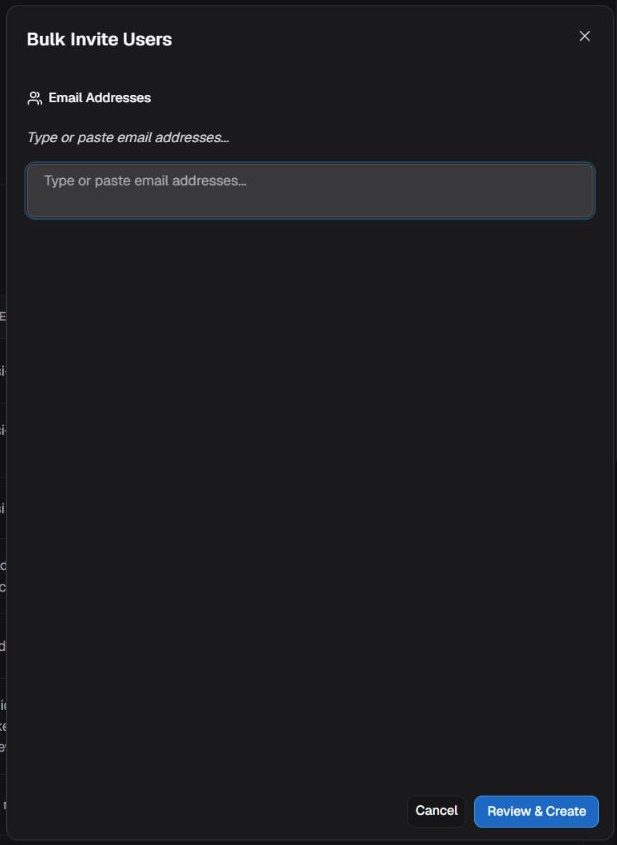
Email addresses for Bulk Invite Users.
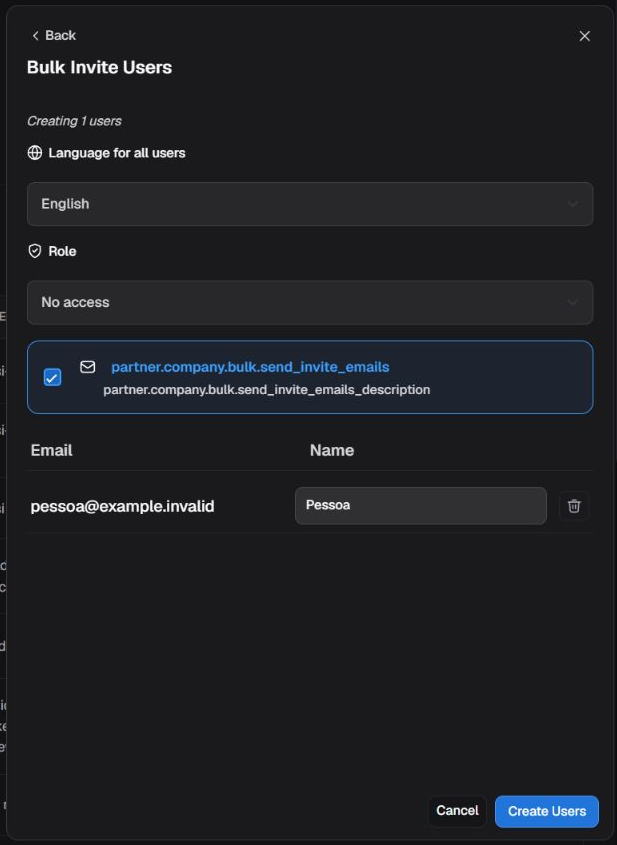
Bulk user review and invitation-email option.
Change a company user's access
Choosing another role directly in a user row requests the change immediately. Check the identity before changing the selector. In the user row, select the gear next to the role to open Edit Role. Check the person identified in the pane. Expand permission groups to review access rights. Changes in this pane are sent when saved; cancel discards the unsaved changes.
Enable or disable changes the user's company access. Resending an invitation requests another message and does not confirm delivery. The owner has specific protections: use the dedicated ownership action when available to your account. If a change is rejected, check the role, assignment limits and destination company.
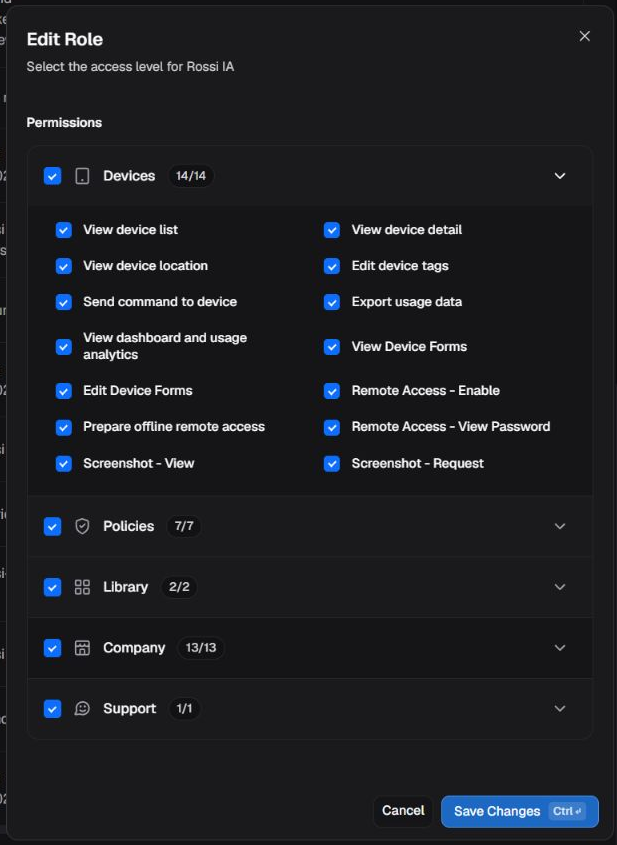
Company user permissions for reviewing granted rights.
Consult tenant settings and users
Open Settings. On Tenant Details, check the tenant name, identifier, type and summary. On User Management, find the person before managing tenant access. Adding an existing person and inviting a new one are different tasks.
In User Management, open Add user. Choose Promote company user to grant tenant access to an existing company user; the first step searches for and selects the person. Choose Create new tenant user to enter new email addresses. In both cases, check the tenant and review the role and permissions in the following step.
For tenant access, Tenant admin provides full administration; Operator supports operational work, including editing policies and sending commands, without full administration; Viewer consults devices, reports and policies without those modification rights. Custom selects specific rights: viewing does not automatically grant editing or commands. Review the displayed rights before granting access. Invitations enabled requests email after creation; disabled creates users without requesting that email.
The first transition, from email entry to review, does not create users yet. In review, check names, role, permissions and the invitation option before selecting Next to complete registration. This button submits user creation and, when invitations are enabled, requests the emails. It does not open a third step. Wait for the result and check the created users before repeating the action.
Removing tenant access removes that tenant grant and strips tenant-administration rights from grants to its companies. It does not delete the person or automatically remove all company rights; remaining company rights and access to other tenants may remain. Owners have specific protections.
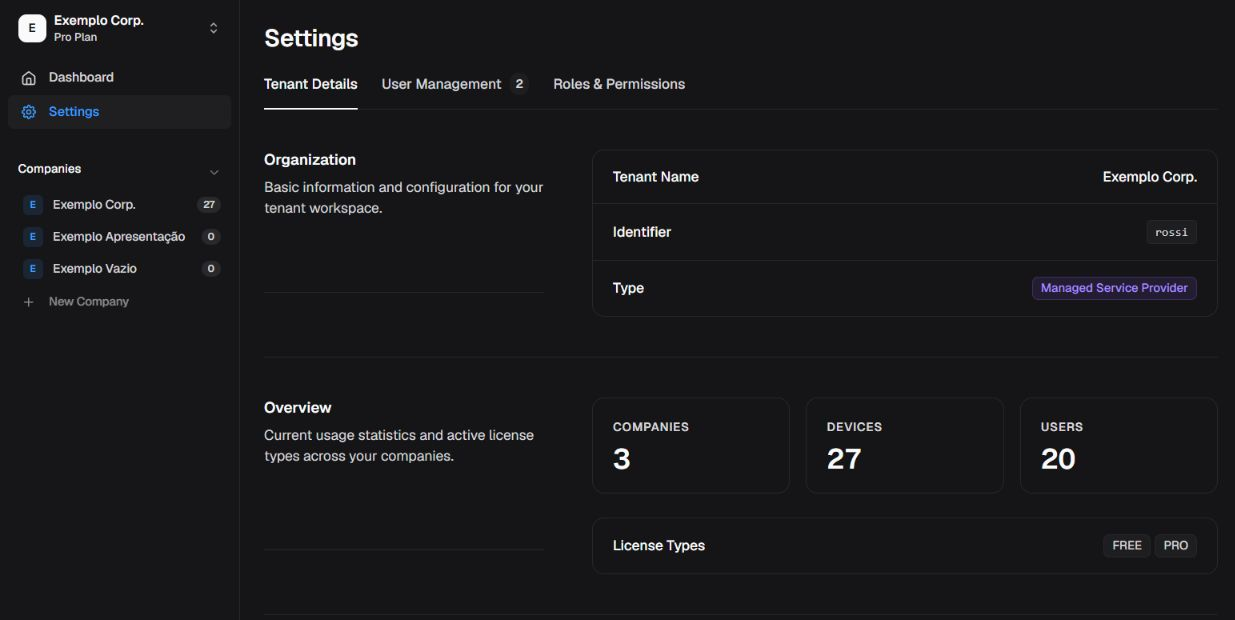
Tenant Details for checking identification and summary.
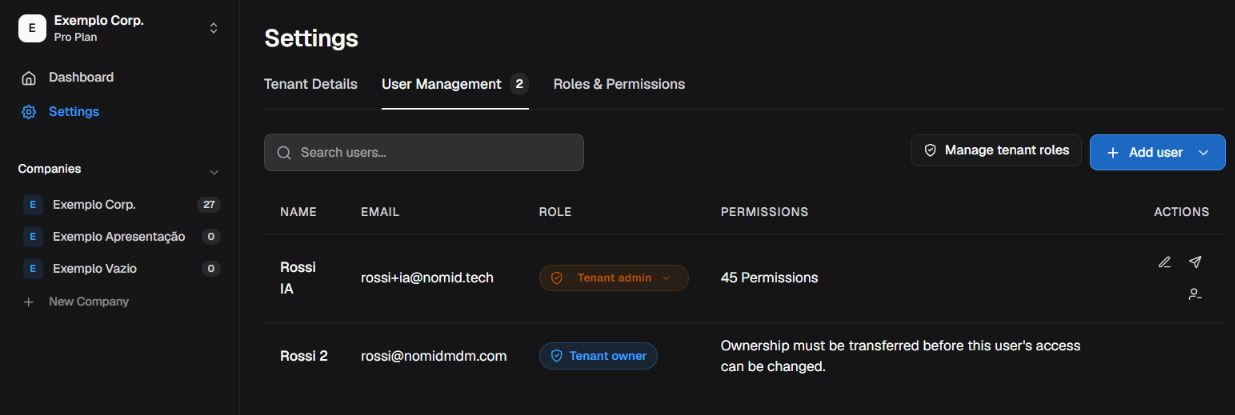
User Management for finding people and managing tenant access.
Changing a role directly in the list sends the update. In the edit pane, review the selections and save to submit the set. Resending an invitation is an email action. Removing tenant access has its own confirmation and affects administration of that tenant, with the scope described above. Check the scope before confirming.
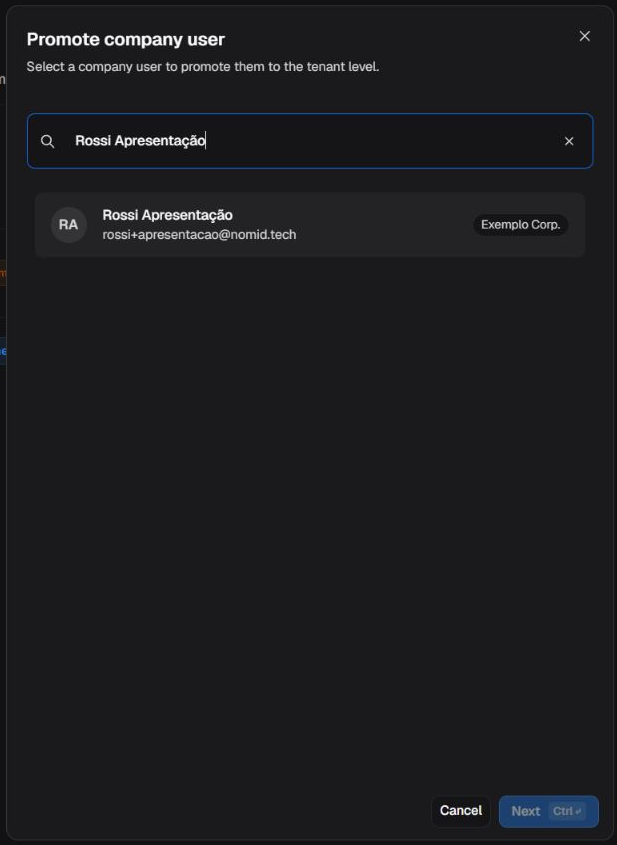
Promote company user: find and select an existing person.
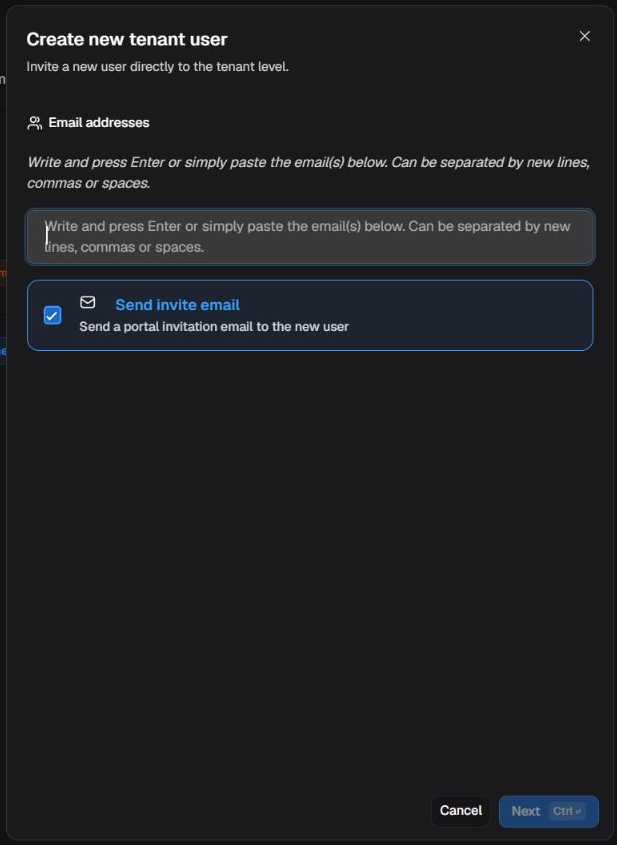
Create new tenant user: enter email addresses.
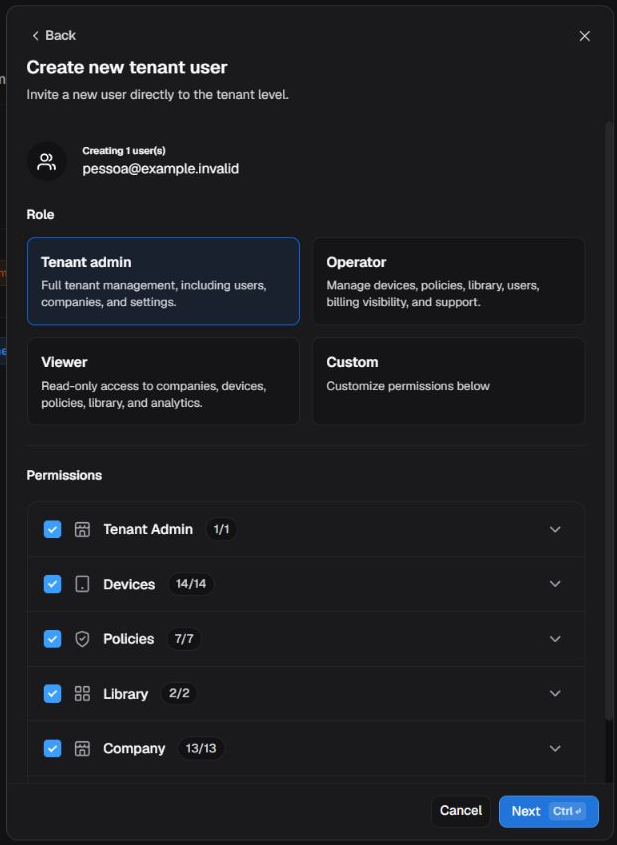
Review of new users’ names, role and permissions.
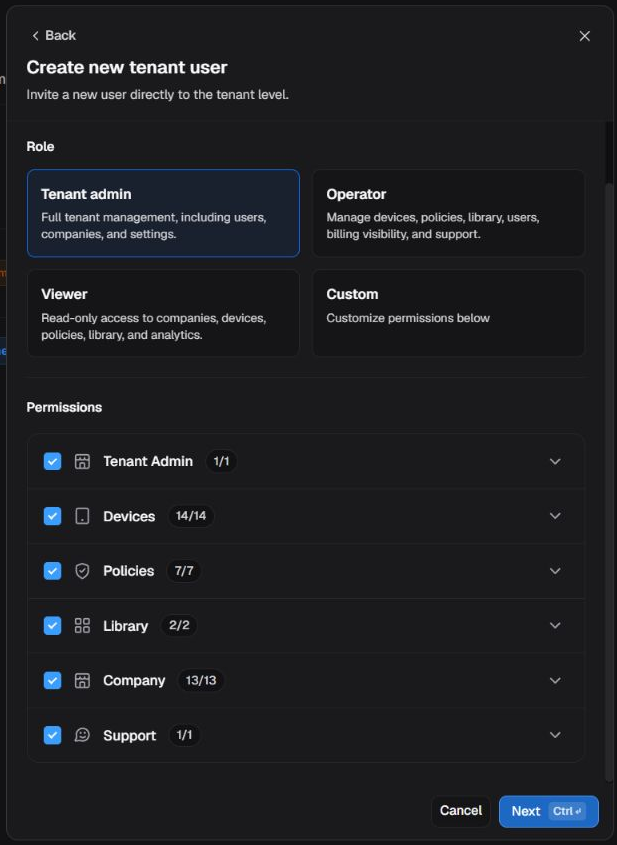
Continuation of review with permissions and form actions.
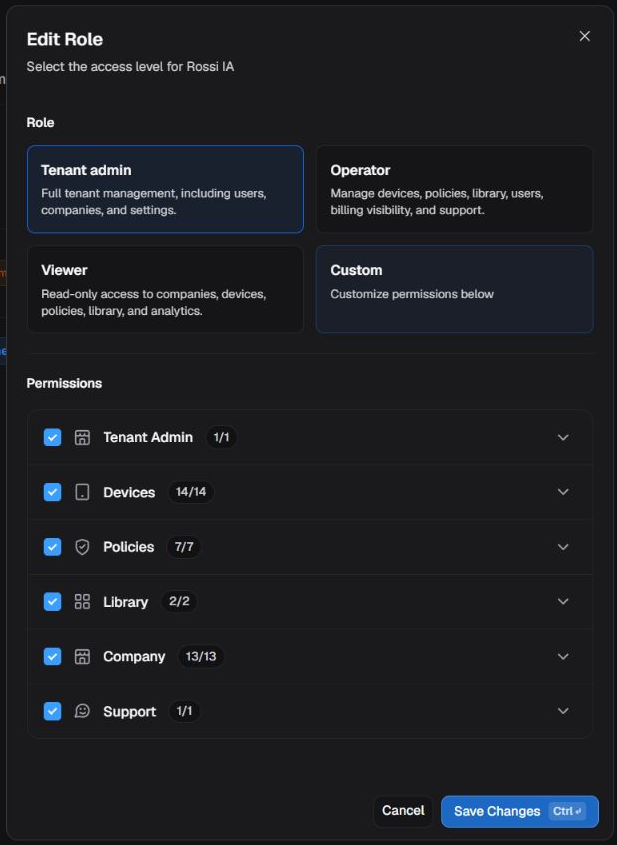
Editing a tenant user’s access.
Review and maintain tenant roles
On Roles & Permissions in Settings, select a role to review permissions and assignments. Expanding a group reveals its rights. System roles are protected from editing; use the + button to create a role to define your own set.
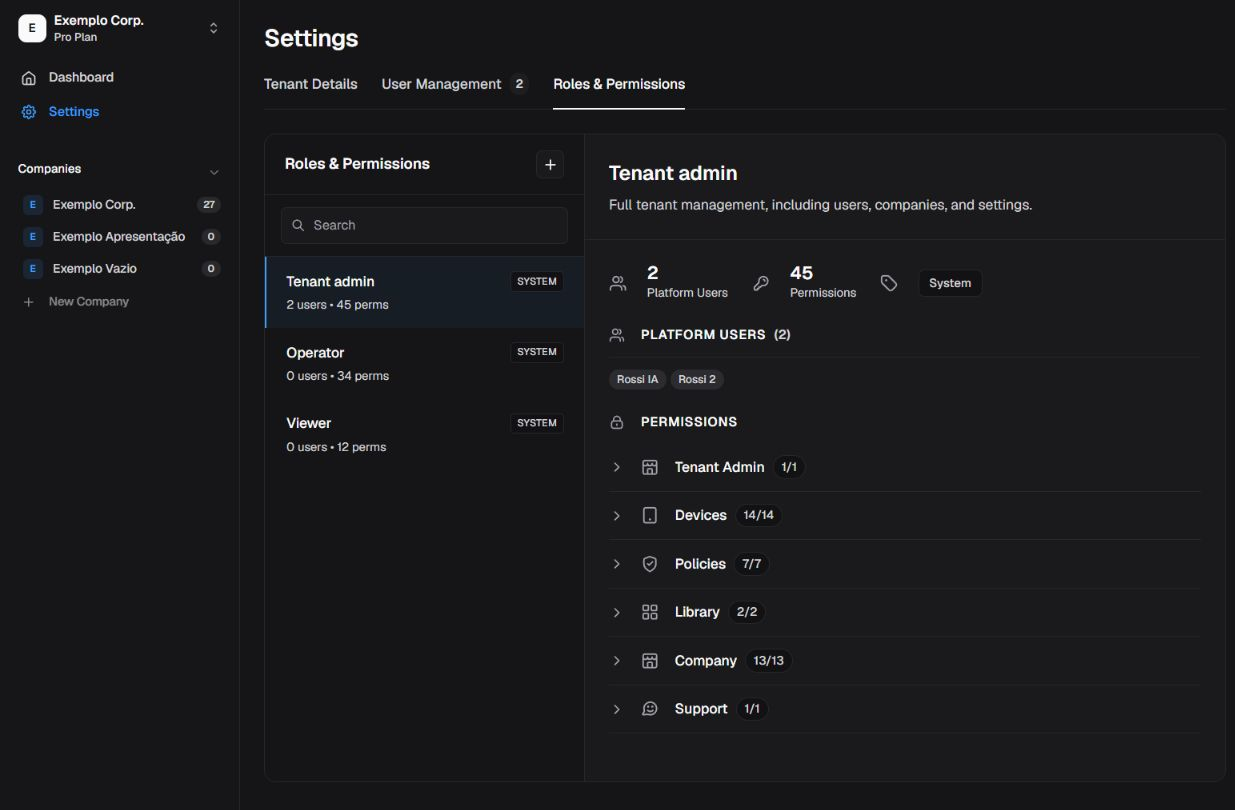
Roles & Permissions for reviewing each role’s rights.
In the editor, review name, description and permissions. Creating or editing prepares unsaved changes until saved. Cancel abandons local changes. Changing an assigned role may affect associated users; review those users before saving. Deleting a custom role requires it to have no assignments.
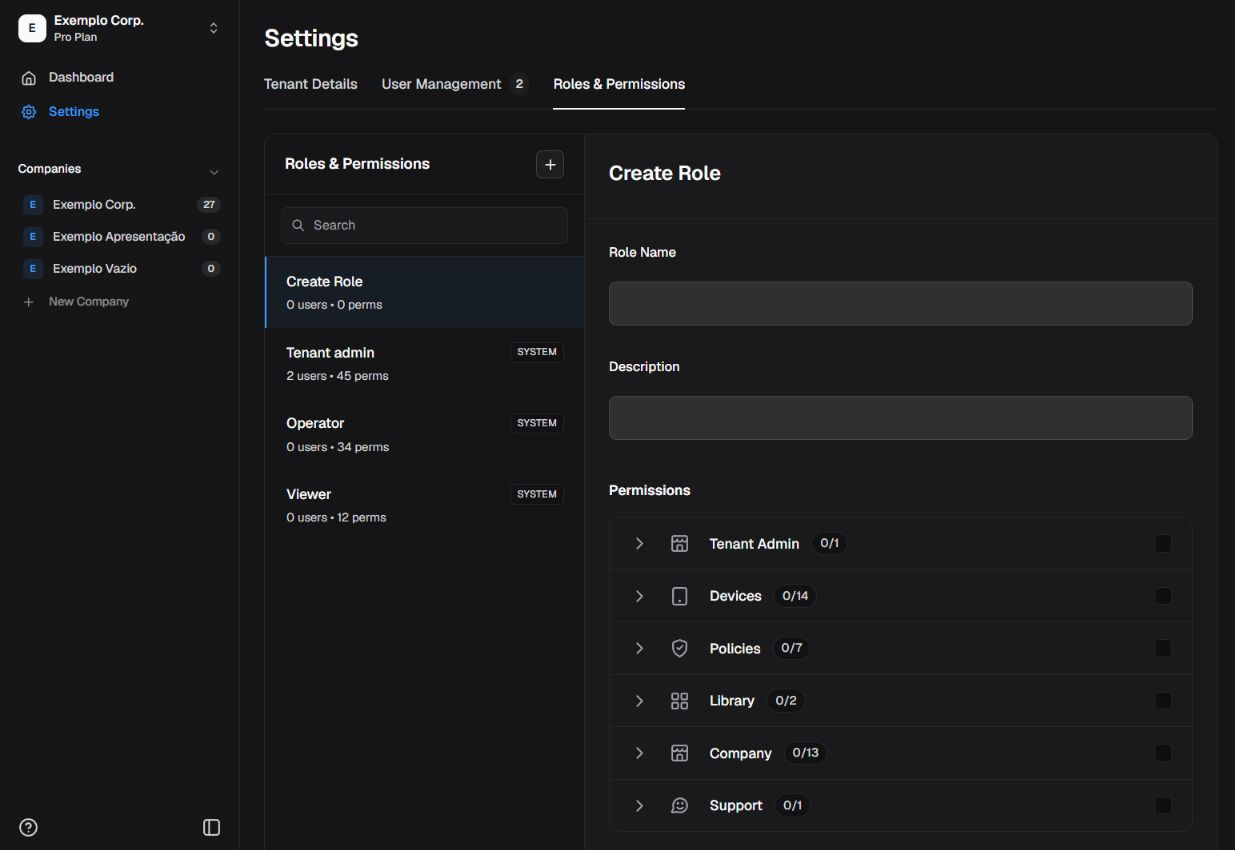
Creating a role: name, description and permission groups.
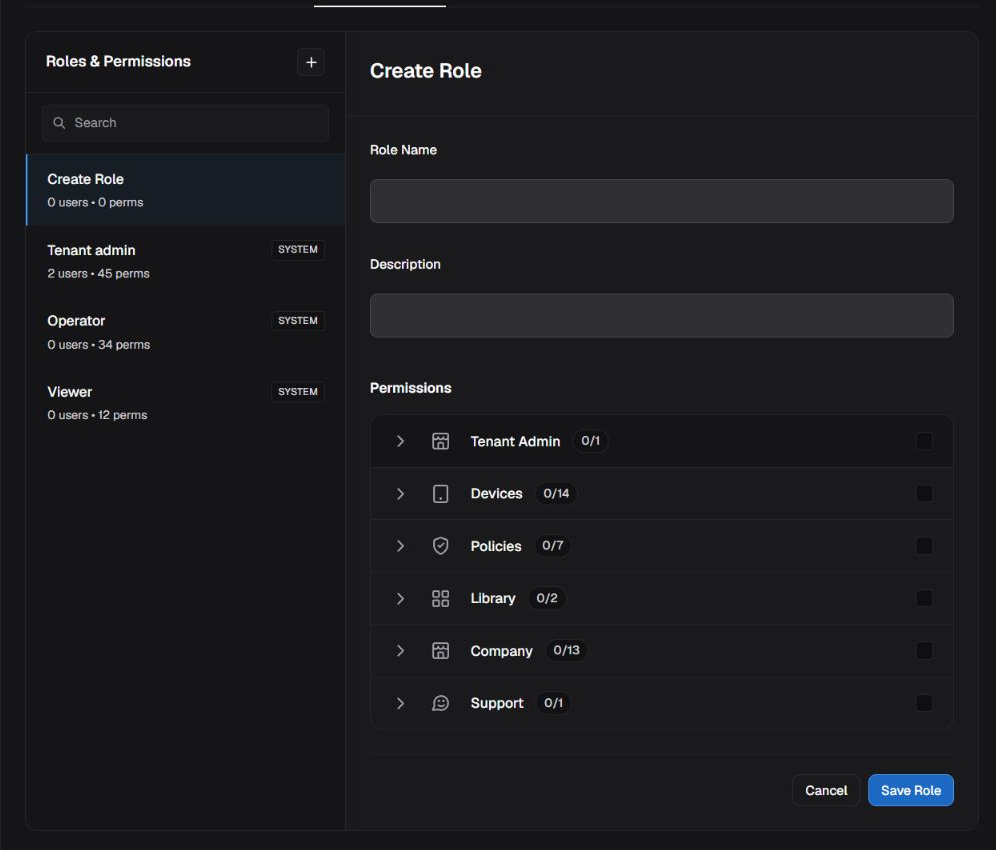
Continuation of the role with permissions and actions to finish or cancel.
Recognize ownership and transfer actions
Ownership differs from an administrative role. Tenant transfer requires the current tenant owner; company transfer can be initiated by the company or tenant owner. Recipients need an enabled authenticated account and enabled scope membership; company ownership requires enabled direct company access. MSP tenants also restrict recipients to permitted provider or Nomid email addresses. Confirm the recipient email. The request remains pending and ownership changes only after recipient acceptance, recent authentication and eligibility revalidation. Cancelling a pending request prevents acceptance. Company transfer changes that company ownership; tenant transfer changes tenant ownership. Ownership transfer is not general access removal.
The visual sequence for entry, confirmation, acceptance and verification remains pending: the ownership dialog was not captured. This candidate does not provide a complete validated procedure for this task.
Consult help and documentation
Open the help button, identified by the question mark in the sidebar, and the documentation entry to consult the manuals. Contextual help appears only when an article is associated with the current screen. The same menu lets you change Portal language and switch between light and dark themes; this changes presentation without granting additional access. For general navigation of these resources, also see Login, menu and help linked in the introduction.
If something is missing or does not load
| Situation | What to do |
|---|---|
| Tenant View entry is missing | Ask for a check of feature availability and your account's administrative access. |
| A tenant or company is missing from search | Clear the search, check the name and review the access available to your account. The Tenant View company list and the context selector serve different purposes. |
| Company switching fails | Wait for the message and check which context remains active before trying again. |
| Company profile is open, but the menu still indicates tenant | You are still in tenant administration. Select Switch to company in the profile to change your workspace. |