 Nomid
Use Class mode to bring devices into one workspace, view their screens and reported information, and send actions to one device or to the session's devices. For example, you can follow an activity, request a screenshot, or ask devices to open the same application.
The operator works in the Portal; commands target managed devices. The session groups equipment without enrolling students or creating a school class. Information and screen images depend on communication with each device.
Before opening
Sign in at https://portal.nomid.tech/ and check the company and devices for the activity. To assign the required rights, see Settings. A role's name alone does not determine which actions are available.
Opening Class mode can already affect devices. When monitoring opens, the Portal sends devices a start request, called interactive mode, and may request an initial screenshot. Additional effects of that start request on the device have not been confirmed; it does not guarantee unlocking, restoration of settings, or release of a pinned app. When live viewing is available, a five-second countdown can start it automatically. Prepare the devices and the content that may appear on their screens before opening; opening is not a view without image collection.
Opening and pinning applications require devices managed by the Nomid agent, identified as AOSP. Every target must be compatible for a bulk action. Live viewing requires specific device capabilities and prepared remote access; shutdown is available for compatible Pico devices managed by the agent. Check the model, management method, features enabled for the company, and connectivity instead of assuming that every Android device offers the same options.
Before sending commands to a group, try the operation on one compatible device and check its result. Agree who will operate the same devices: do not rely on automatic exclusivity between operators or guaranteed restoration after a network loss.
Choose devices and enter
From the device list
Access: [Send command to device].
- Open Devices and find the equipment for the activity.
- Explicitly select the required rows and check the selection count.
- Under Manage device, choose Class mode.
- In the workspace, check the names and count before using a bulk action.
The entry uses the selected devices. Selecting all filtered results disables this entry; return to an explicit row selection. The total number of search results is not the session's participant count.
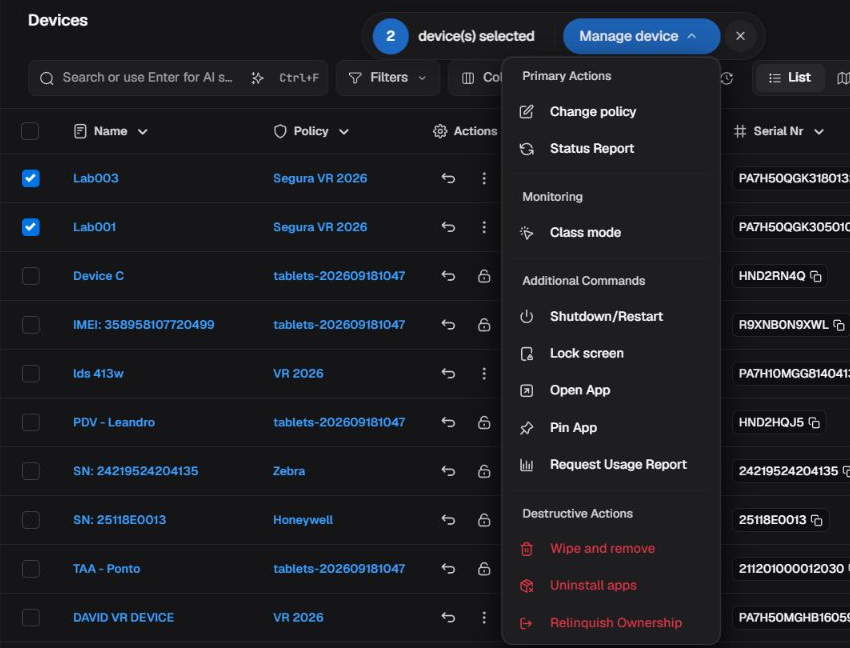
Figure 1. Explicit selection and Class mode entry in the device list.
From the policy list
Access: [Send command to device].
In the policy list, find the correct policy, open its actions menu, and choose Class mode. The Portal looks for associated devices you can access and then opens the workspace. If the lookup fails or finds no devices, address the message before continuing.
This entry targets the policy's associated set, rather than a manual selection of two devices. Check the policy and its associated-device count before using it. If you need only some devices, select their rows in Devices. Opening this menu does not save or change the policy.
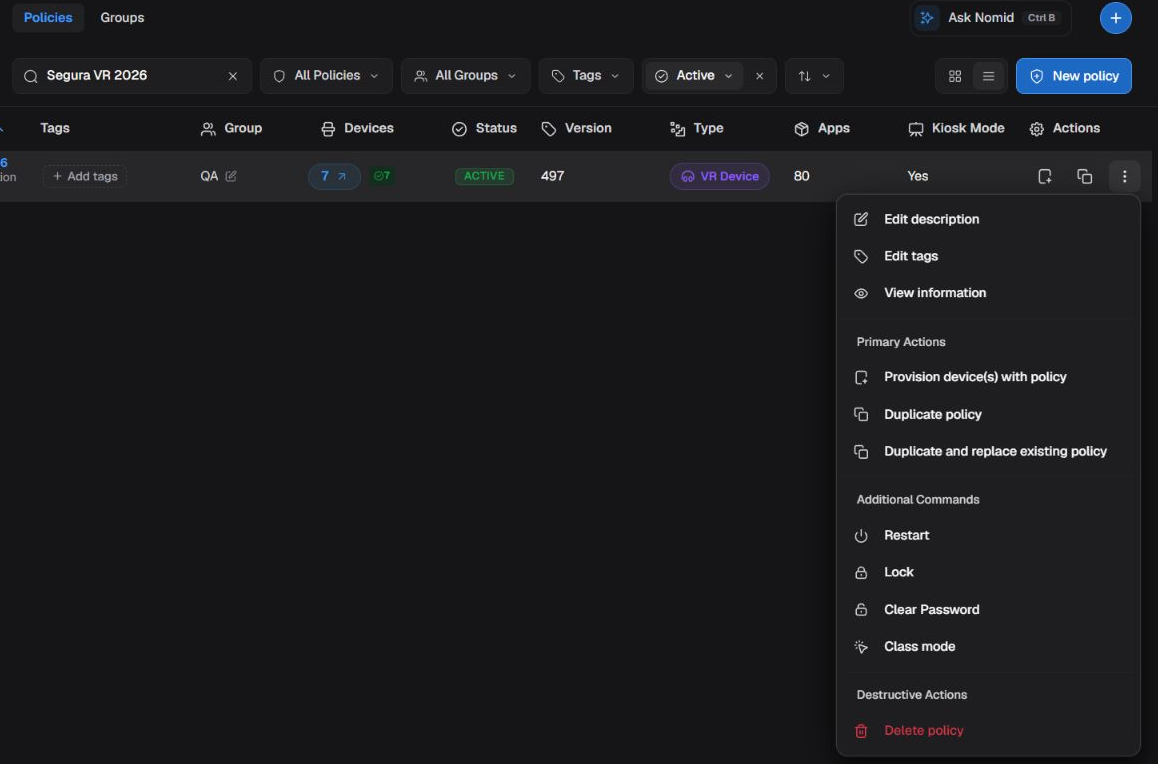
Figure 2. Class mode entry in the filtered policy actions menu.
From the VR policy workspace
Access: [Send command to device].
In a ready, undeleted VR policy workspace, open Actions and choose Class mode. This entry also loads the policy's associated devices; check the scope before proceeding. It is not a save action for the configuration.
To edit device settings, continue in VR/Pico policies. Here, the purpose is to enter the monitoring workspace.
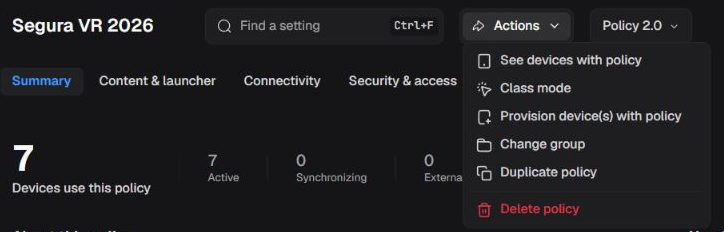
Figure 3. Entry through the Actions menu in the VR workspace.
Use the session workspace
The header shows the device count and elapsed time since the workspace opened. This duration does not measure student attendance, application usage time, or confirmation that every device received the initial request.
The grid arranges cards automatically. It keeps the set received when opened; there is no participant editor in this workspace. To change the set, return to the entry screen, adjust the selection, and check the resulting session. If a session already exists for the same selection, the entry may restore it; another selection may replace the previous session after it closes.
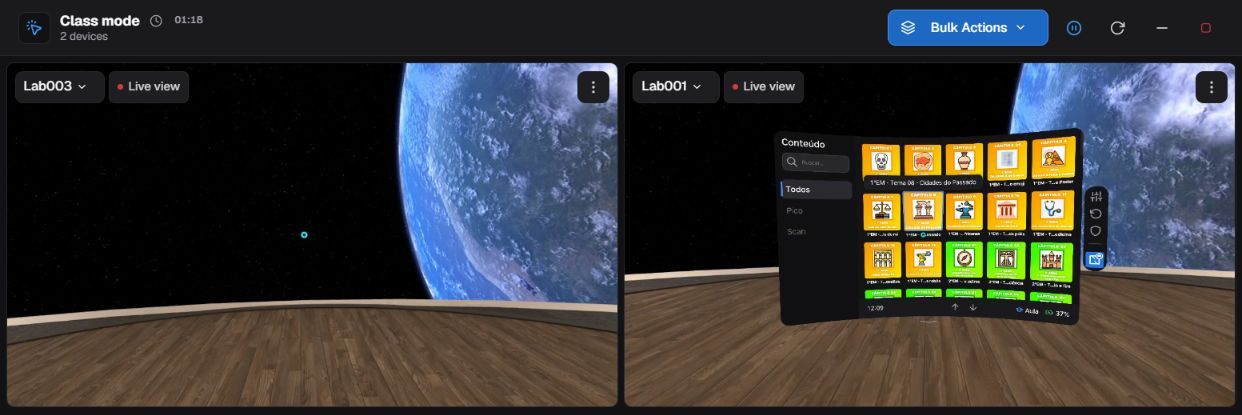
Figure 4. Session header and device cards.
Bulk Actions
Use Bulk Actions to work with the devices in the session. To target just one device, open that device card's menu.
| Option | Purpose |
|---|---|
| Open App | Requests that a selected app be brought to the foreground on compatible targets. |
| Pin App | Requests a temporary restriction to one app, with a duration and an expiry action. |
| Take Screenshot | Requests a new static image from the devices. |
| Lock Screen | Sends a screen-lock request to the session's targets. |
| Shutdown/Restart | Opens the power confirmation; you still need to check the option and send it. |
Opening the menu does not send these commands. Availability differs by action: the procedures below explain the requirements and how to check the result. The bulk scope is the session, not every device in the company.
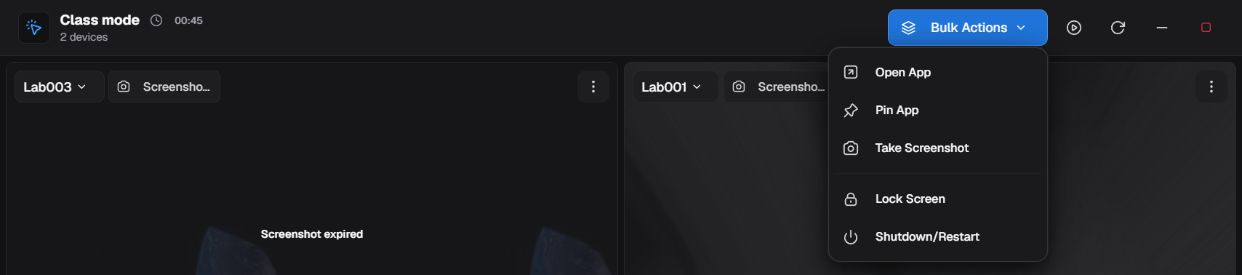
Figure 5. Commands offered in the Bulk Actions menu.
View, pause, and resume live screens
Access: [Remote Access - Enable] [Remote Access - View Password].
Live mode receives a device's screen so you can follow its current activity. In addition to these rights, the company needs the feature, the device needs remote registration and compatible capture capabilities, and its policy must allow remote access. In this experience, live eligibility depends on Pico with compatible capture; having a static screenshot does not guarantee live viewing. For preparation, see Nomid Remote.
When an eligible session opens, the Portal may start a five-second countdown. Activate the control during the countdown to cancel automatic start. This does not undo the monitoring start request sent to the device or an initial screenshot request already made.
Use the global Pause screen view of every device control to interrupt the monitors. Use Show the screens of every device to resume. You can also pause or show one screen from its card menu; check the cards after resuming, since individual choices and connection problems may leave them without a stream.
Pausing changes the view without ending the session or releasing a pinned app. The figure shows the workspace after a pause; it does not show the initial countdown. A static image still visible on a card does not mean that streaming continues.
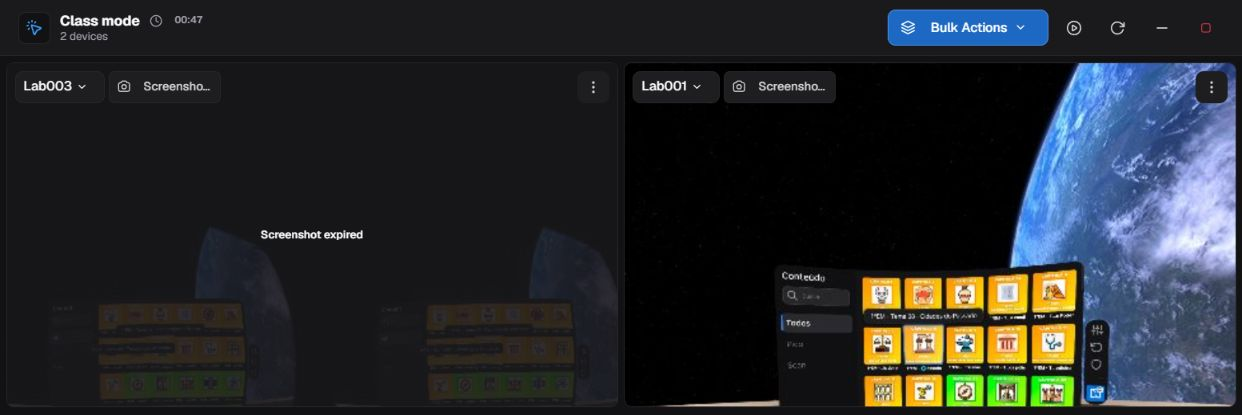
Figure 6. Workspace after a global pause, with static images on the cards.
There are up to 36 simultaneous monitors; do not interpret this as a confirmed class-size limit. Monitor selection may prioritize visible cards when more targets are eligible. Smoothness depends on stream count, the computer, and the network. If a full remote-access session is open, the grid may suspend its monitors; when you return, check their state and resume when the control is available. Full remote-access operation is described in Nomid Remote.
Refresh all
Use Refresh all to read the same devices' details and status again. Wait for the read and check the returned values. This is not a new screenshot request and does not reload participants after changes to a policy's device associations.
Minimize and restore
Use Minimize to free the Portal workspace while keeping the session. The dock retains its title, device count, and duration; click it to restore the workspace.
Minimizing does not pause or stop monitoring by itself. Pause before minimizing if you want to interrupt screen viewing. To finish the activity, stop the session as described below. Do not treat the main workspace disappearing as confirmation of a stop.
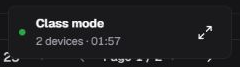
Figure 7. Minimized session dock and restore control.
Inspect one device
Details and identification
On the card, open the control bearing the device's name to view its details. Check identity before sending an individual action. The copy buttons place the available name or serial number on your clipboard; they do not edit the device record.
| Information | How to use it |
|---|---|
| Name and serial number | Identify the target. Use both when device names are similar. |
| Current app | Shows the app reported by the device; it does not prove that a recent command ran. |
| Battery | Helps decide whether the device can continue the activity. It is a reported value, not a separate Portal measurement. |
| Last sync | Indicates a device update. It is not the screenshot's acquisition time. |
| Controller battery | On Pico, shows controller data when reported. Dashes or missing values do not mean the battery is charged. |
| View mode | Distinguishes live streaming, a static image, and other card states. |
If Screenshot expired appears while the mode says live viewing, the message refers to the previous static image; do not automatically interpret it as a stream failure.
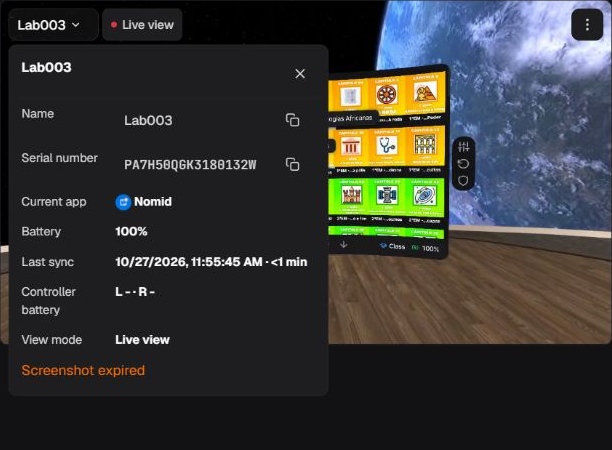
Figure 8. Device identification and status details.
Interpret synchronization
The indicator considers the age of the last received record: less than 90 seconds is the most recent range; 90 to 240 seconds is the intermediate range; over 240 seconds or no record is the range without a recent update. These ranges are not an instant network test or a command-delivery guarantee.
Check Last sync and the card's data before repeating an action. An offline device may remain in the grid with older information and images. A missing new status also does not mean the device was deleted from the Portal.
Individual menu
Open the target card's actions menu. View mode contains screen choices; Apps contains opening and pinning; Device contains lock and power actions. Individual actions target the chosen card; the global menu targets the session.
The menu may be unavailable during loading, an error, or a screenshot request. Wait for completion or address the cause before another action. Live and fullscreen choices also depend on the current mode and compatibility.
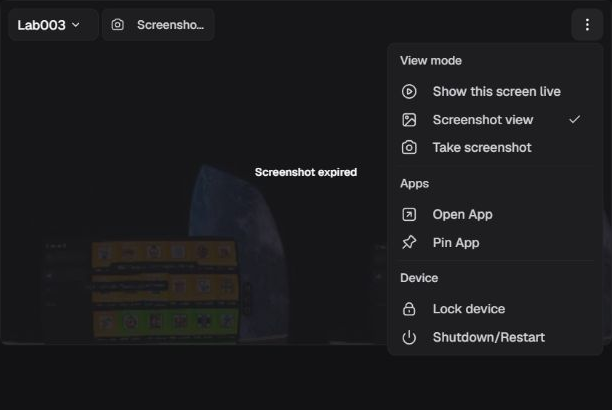
Figure 9. Individual actions menu on a device card.
Use screenshots and fullscreen
View a static image
Access: [Screenshot - View].
In the individual menu, choose Screenshot view to inspect the received image. This pauses live mode for that card and does not request a new image.
A screenshot represents one moment, even if it resembles the device's current screen. The Portal marks it as expired when it exceeds the current ten-minute threshold. To check the current situation, request a new screenshot or return to live mode when available.
Last sync can update without a new image arriving. When no separate acquisition time is shown, do not use that field to date the screenshot.
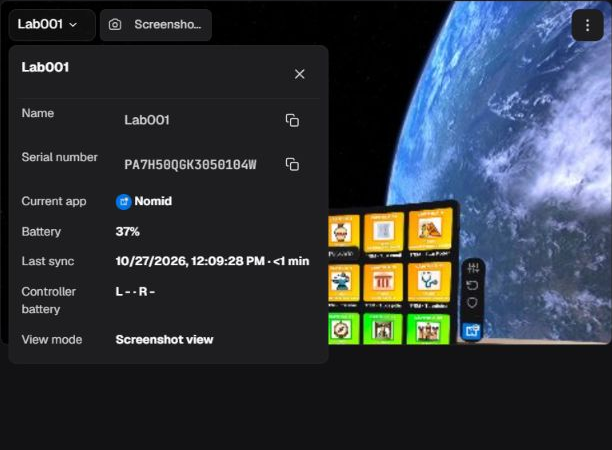
Figure 10. Screenshot view with a received static image.
Request a new screenshot
Access: [Send command to device] [Screenshot - Request] [Screenshot - View].
- On the device card, open the menu and choose Take screenshot. For the whole session, use Bulk Actions → Take Screenshot.
- Wait for the requesting state and then the received image. A request may take time or finish without a new image.
- Check each target's result. A sent message or a return to the previous image does not confirm a new capture.
The request collects screen content: agree on collection with the person using the device and check the targets before sending. In a bulk request, one card that is loading, has an error, or has a pending request may block the global button. Address that card or work individually with devices that are ready.
If the image does not arrive, check connectivity, synchronization, and compatibility before repeating. Avoid successive requests to the same device. The initial capture when opening a session is a separate flow; do not assume that removing only the screenshot-request right eliminates that initial collection.
Enter and exit fullscreen
When the card is live and the browser offers the feature, use Enter fullscreen to enlarge its view. Use the exit control to return to the grid. If the browser refuses, continue in the card and check fullscreen support.
Enlarging changes the computer's presentation. It does not grant mouse or keyboard control of the device and is not equivalent to opening a full remote-access session.
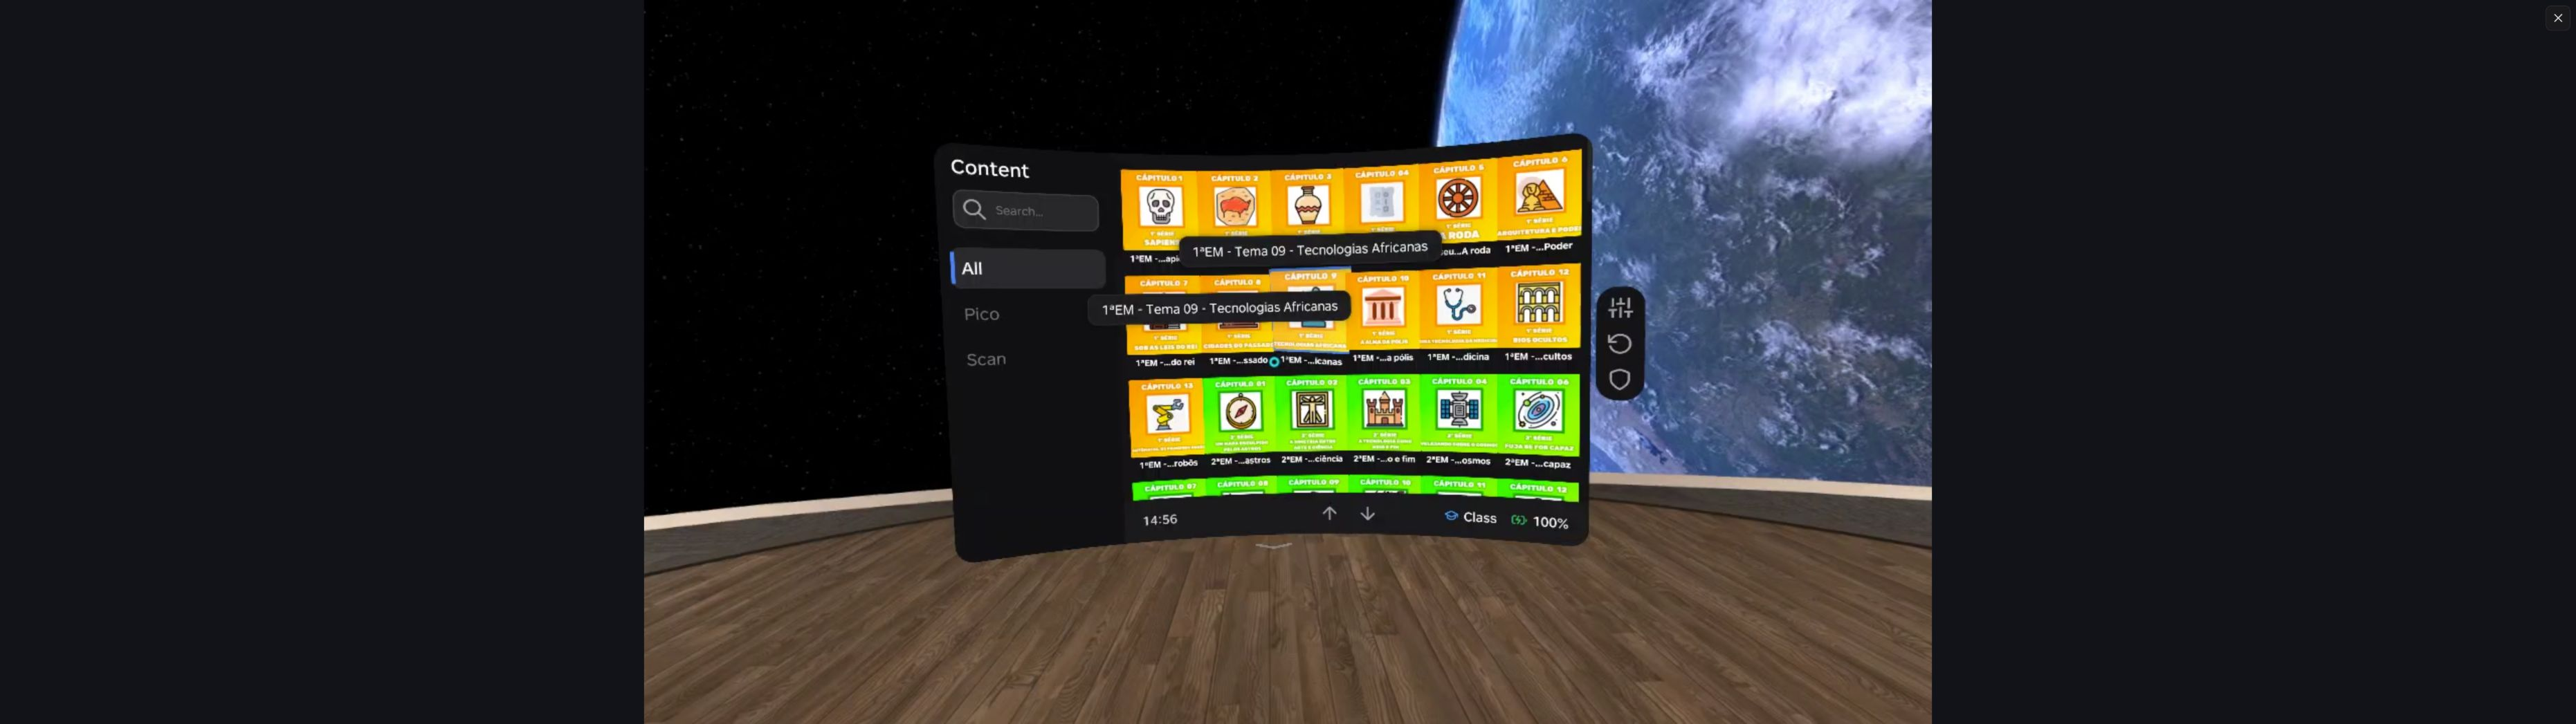
Figure 11. Enlarged view and exit-fullscreen control.
Open, pin, and release applications
Open App
Access: [Send command to device].
Use Open App in the global or individual menu to request an app in the foreground. This helps direct devices to an activity that is already installed; it does not install the app.
- Check the individual target or the session's devices. Every bulk target must be managed by a compatible agent.
- Search by app name or package. Library narrows the list to apps classified as part of the company's library; All apps broadens it. Changing the filter clears the selection, so select again before sending. If Library has no matching apps but others exist, the selector may switch to All apps; check the active filter.
- Choose the app and check its presence on the targets. The list combines apps found across the set; one entry does not guarantee installation on every target. An indication such as 2/2 helps compare coverage for that set.
- Use Send, then check the application on the device. To leave before sending, use Cancel or the pane's close control.
Return to home screen requests the device's home screen instead of an app from the list. In Class mode, clicking the area behind the pane does not close it; use its own controls. While a send is in progress, wait for the result.
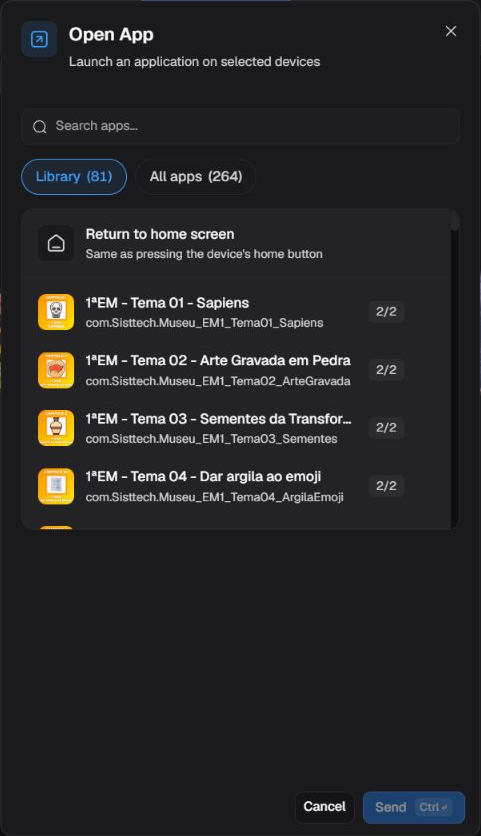
Figure 12. App picker with search, filters, and return-home entry.
Pin App
Access: [Send command to device].
Use Pin App to ask compatible devices to remain temporarily in one app, limiting navigation during an activity. This is a temporary command and does not change the policy's entire configuration. Check its behavior on one device before using a bulk action.
Select the app and set Lock duration in minutes. The initial value is five minutes; +10 min and +30 min add to the current value. The field accepts whole minutes from 1 to 43,200; check the final value before sending. The session header's duration is not this pin's time limit.
| Option | Requested effect |
|---|---|
| Return to home when the lock ends: off | Does not include a request to return home at expiry. Do not rely on this option to close the app automatically. |
| Return to home when the lock ends: on | Includes a request to close the app and return home when the pinning period ends. |
Use Send to request the pin, then check on the device that the app is in the foreground and which navigation remains available. Behavior and expiry depend on the agent and compatibility. Do not assume that an offline device met the time limit; check recovery and use the specific release action when needed.
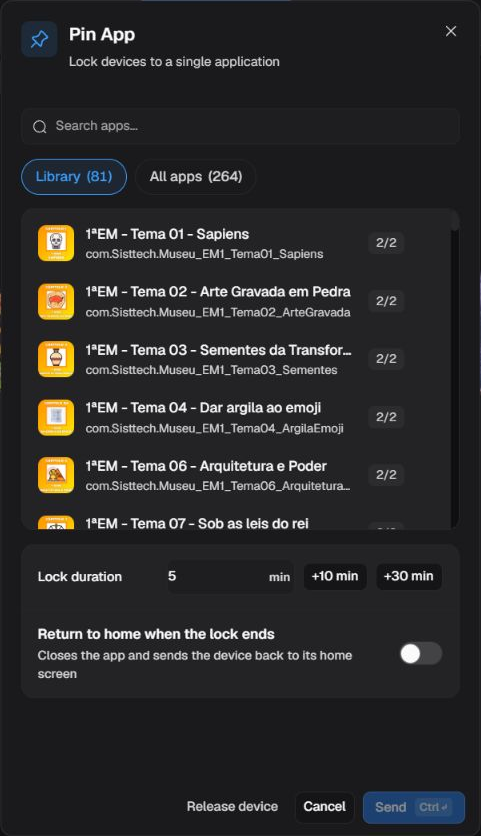
Figure 13. Temporary app pinning, duration, and return home on expiry.
Release device
Access: [Send command to device].
In the pinning pane, choose Release device to open Remove the app pin. This step offers recovery without choosing another application. The presence of the button does not confirm an active pin on the device.
| Option | Requested effect |
|---|---|
| Keep the current app open | Requests removal of the pin while keeping the app in use; this is initially selected. |
| Return to the home screen | Requests removal of the pin, closure of the app, and a return home. |
Check the scope, choose the destination, and use Release. Then check on the device that the restriction ended and the intended screen is shown. To reconsider before sending, use Back; to leave without requesting release, use Cancel or close the pane. Stopping Class mode does not replace this release action.
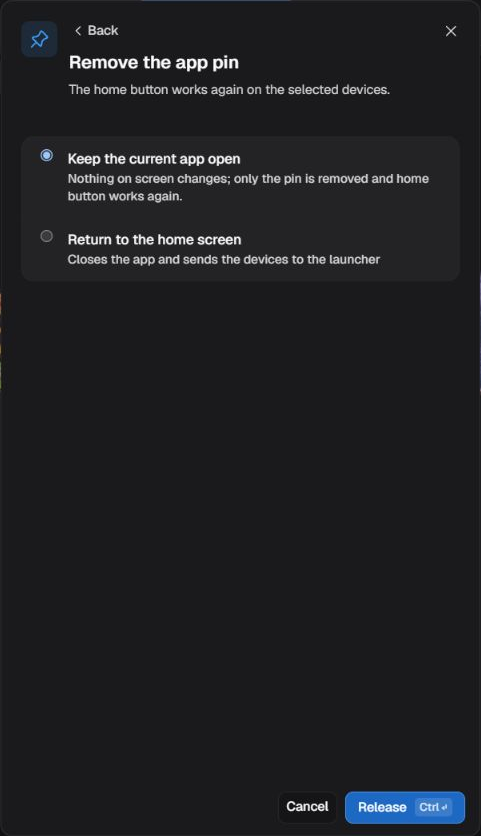
Figure 14. Release step with a choice of device destination.
Lock screens and use power actions
Lock screen
Access: [Send command to device].
Use Lock device on a card, or Lock Screen under Bulk Actions, to send a lock request to the corresponding targets. This can interrupt the device user's activity; check identity and scope before activating it.
Check the device's screen after the request. This menu has no equivalent unlock action; recovery depends on that device's configured unlock methods and policy. A sent message in the Portal does not guarantee a locked screen.
Shutdown/Restart
Access: [Send command to device].
On the card or in the global menu, open Shutdown/Restart. The dialog has not sent the command yet. In Class mode, when every target is a compatible Pico managed by the agent, it opens with Shutdown selected. Check the option before confirming; do not assume that restart is the default.
| Option | Requested effect and care |
|---|---|
| Reboot | Requests a device restart, interrupting apps and connectivity. Save the activity and check that contact returns; do not rely on recovery of unsaved work. |
| Shutdown | Requests complete power-off. Connectivity will be interrupted and the device may need to be powered on physically before use resumes. Available only for compatible targets. |
Check the selection, individual target or session count, then use Send. In the bulk dialog, all devices means the session's targets, not the entire company. The immediate-send warning describes the consequence of Send, not of opening the dialog. To leave before sending, use Cancel.
After sending, check each device's result and its actual condition. A successful server response or a sent message does not prove that restart or shutdown finished. Network interruption, incompatibility, and one target's failure may require individual checks.
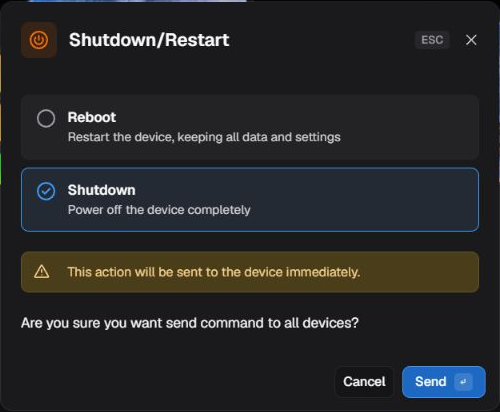
Figure 15. Power confirmation with Shutdown initially selected.
Stop the session
Access: [Send command to device].
When finished, use Stop in the header. The Portal stops its monitors and attempts to send devices a request to end monitoring, corresponding to leaving interactive mode. Additional effects of that request on the device have not been confirmed; do not rely on unlocking, restoration, or an automatic recovery time. The workspace may close without confirmation of a stop on the device.
Check devices before considering the activity complete, especially after network loss or communication errors. If an app is pinned, use its specific release action and check the result; closing the session does not guarantee release. If you cannot confirm recovery, ask the local person responsible to check the device.
Closing the tab, signing out, or losing connectivity should not be used as a guarantee of stopping and restoration. Do not rely on an automatic recovery deadline or automatic coordination between two operators.
Resolve problems and check the result
| Situation | What to do |
|---|---|
| Class mode or an action is missing | Check the entry used, action-specific rights, company features, and target management method. Every target must be compatible for bulk app actions. A missing button is not necessarily a display problem. |
| Live viewing stays in preparation or connecting | Check the network, remote registration, device capability, and whether the policy allows remote access. An existing screenshot does not replace these requirements. Do not change the policy merely to retry without assessing the effect on its devices. |
| Live viewing is unavailable during full remote access | Return to the remote-access flow, finish it when appropriate, and check the grid before resuming its monitors. |
| No image or no screenshot permission | Distinguish the right to view, the right to request, and target connectivity. Without viewing rights, an accepted request does not guarantee access to the image. |
| Screenshot has not arrived or has expired | Wait for the pending request, check synchronization, and avoid repeated requests in quick succession. For a current screen, use a new authorized request or compatible live viewing; the old image does not confirm current status. |
| Authentication or network error | Resolve the Portal session or connectivity and use Retry in the message. Repeated authentication failures may pause queries; retrying does not grant a missing permission. |
| Success message without an effect on the device | Check the individual result and communication. Some messages indicate acceptance of a request; an app, lock, or power action needs checking on the device. Do not repeat an impactful command just because its effect has not appeared yet. |
| Only part of the bulk set responds | Check app installation, management method, network, and each target's result. An aggregated app list and bulk send do not guarantee the same outcome everywhere. |
| Workspace closed but device remains restricted | Check app pinning and its specific release action. Without communication, arrange a local check; interface closure does not confirm physical restoration. |
For permanent device configuration, continue in the relevant policy article. When following an activity, distinguish viewing a screen, sending a request, and confirming its effect on the device.