 Nomid
This guide shows how to enroll PICO enterprise headsets in Nomid MDM and manage them with a VR/Pico policy. You create the policy in the Nomid Portal, connect each headset to a computer over USB, and let the Nomid Ops desktop app provision it. After that, the headset takes its apps, launcher, Wi-Fi and security settings from the policy, and appears in the Portal next to your Android phones and tablets.
Enrollment method: Nomid enrolls PICO headsets only over USB with Nomid Ops, not with a QR code. Zero-touch and Samsung Knox Mobile Enrollment are not available for PICO.
Risk: provisioning makes Nomid the device owner of the headset. A headset that already has an account or another management app must be factory reset first, which erases everything on it. A wrong Wi-Fi name, security type or password stops provisioning, often with only a generic error. Enroll one pilot headset before a batch.
Before you begin
- A Nomid MDM company with VR headsets enabled. If VR headset does not appear when you add a device in the Portal, contact Nomid support.
- The Enroll policy permission, and Edit policy to create or change the VR/Pico policy.
- A PICO Neo 3, PICO 4 or PICO 4 Ultra enterprise headset, charged. For any other PICO model, confirm support with Nomid before a rollout.
- A new headset, or one with no account and no other device management. To remove an existing account or management app, factory reset the headset as described in PICO's documentation.
- A Windows or Mac computer with Nomid Ops installed, as described in step 2.
- A USB data cable. Charge-only cables do not work. For several headsets at once, use a powered USB hub.
- A Wi-Fi network the headset can join during provisioning, with access to the addresses in Network requirements.
1. Create a VR/Pico policy
- In the Nomid Portal, open Policies and create a policy. Select VR / Pico Policy as the platform.
- Choose a starting point: the Education or Industrial Training template, or Start from scratch. Both templates block factory reset on the headset, set up the headset launcher and turn on status reporting.
- Select the apps from your company's store. Apps chosen in this step are installed on every headset that uses the policy. To add your own APK, upload it to the Library first.
- Select Create Policy.
To reuse a policy instead, choose Copy from existing policy and pick another VR/Pico policy as the source. The copy keeps the source's platform and settings, and Create makes it right away, without the app step, so review the inherited apps, launcher, networks and restrictions afterwards.
The full wizard is described in New policy: create a VR/Pico policy. Before you enroll headsets, open the policy and review its Connectivity tab: add the Wi-Fi network the headsets will use, so Nomid Ops can send it during provisioning. Launcher, content and security settings are covered in 4.2. VR/Pico policies — 2.0.
2. Install Nomid Ops
- In the Portal, open the policy and its Enrollment tab. You can also select + in the header, then Add new device(s) and VR headset.
- The VR headsets card lists the three steps and the installers. Select Download for Windows or Download for macOS and run the installer. Downloading does not enroll anything.
- Open Nomid Ops and sign in with your Nomid account. In the user menu, check that the right company is selected: the policies, apps and devices you see in Nomid Ops belong to that company.
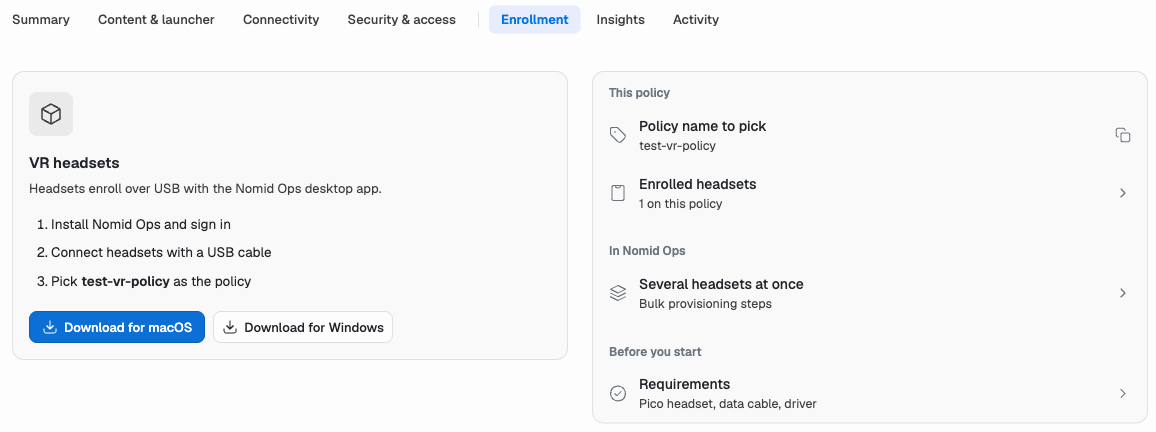
Copy the policy name from this tab, so you pick the same policy in Nomid Ops.
On Windows, confirm the User Account Control prompt only when it names Nomid Ops with Nomid Tech as the verified publisher. Sign-in, the user menu and the other app screens are covered in the Nomid Ops manual.
3. Prepare the headset
- On the headset, turn on Developer Options: open Settings > General > About This Device and select Software Version ten times, as described in PICO's Business Settings instructions. Menu names follow the headset's language.
- Open Settings > General > Developer Options and turn on USB Debugging.
- Connect the headset to the computer with the USB data cable.
- Put on the headset, or look at its screen, and allow USB debugging for this computer when it asks.
In Nomid Ops, the Devices tab lists the headset. It is ready when its state is Connected and Authorized. Unauthorized means the prompt on the headset has not been accepted yet; Connected, ADB disabled means USB Debugging is still off.
4. Provision with Nomid Ops
- In Devices, select the headset, or several headsets, and select Start Provision.
- In Policy Configuration, select the VR/Pico policy you created. Its name is shown on the policy's Enrollment tab in the Portal.
- In Content Selection, check the apps the policy installs and download any that are not cached yet. Nomid Settings is always included: it is the Nomid agent that manages the headset.
- In Wi‑Fi networks, confirm the network the headset will use. Networks from the policy are included; use Add Wi-Fi manually only for a network the policy does not have. Check the name, security type and password: a wrong value stops provisioning.
- Check Enable OS update. It is selected by default and runs only after you download the operating system image. That image is PICO's PUI 5.9.9 for the PICO Neo 3, and Nomid Ops does not check the model before installing it, so clear the option on a PICO 4, PICO 4 Ultra or any other model. On a Neo 3, the update needs at least 40% battery and restarts the headset before provisioning continues. On Windows, Nomid Ops may ask for administrator permission to repair the USB driver the headset uses in update mode.
- Optionally, use Device Naming to name headsets in order and add tags, and Performance Settings to choose how many headsets run at once. Start with Balanced.
- Review Ready to Provision and select Start Session.
Keep the headset connected while the session runs. Nomid Ops installs Nomid Settings, makes it the device owner, installs the policy's apps and VR environment, and registers the headset with your company. On a new headset, it also completes PICO's first-run screens. A card can reach 100% and stay In Progress until the Portal confirms the headset as active; it moves to Completed after that. The session console, its filters and its logs are described in the Nomid Ops manual.
5. Verify the enrollment
- In the Portal, open the policy's Enrollment tab. Enrolled headsets counts the headsets on the policy; Open the device list shows them.
- Open the headset and check its Summary: Status is Active, Brand and model shows the PICO model, Policy is the VR/Pico policy you chose and Management mode is Full. The VR/Pico summary is described in Devices.
- On the headset, check that the launcher and apps from the policy appear.
Policy changes you save later are sent to the headset when it syncs over its network connection, so you do not need to provision it again.
Several headsets at once
Connect every headset, authorize each one and check that Nomid Ops lists them all as Connected and Authorized. Select them all, choose the policy once and start a single session. Keep each headset connected until its card shows Completed. With Performance Settings, raise the number of simultaneous headsets only if the computer and USB hub stay stable; use good cables and a powered USB 3.0 hub for large batches.
Troubleshooting
| Problem | Likely cause | What to do |
|---|---|---|
| The headset does not appear in Nomid Ops | Charge-only cable, a faulty USB port or USB Debugging still off | Use a data cable and another port, check USB Debugging and reconnect. |
| Connected, ADB disabled | USB Debugging is off | Turn it on under Settings > General > Developer Options. |
| Unauthorized | The USB debugging prompt was not accepted | Accept it on the headset. If no prompt appears, reconnect the cable. |
| The policy is missing in Policy Configuration | Nomid Ops is signed in to another company, or the list was loaded before you created the policy | Check the company in the user menu and refresh the list. |
| Provisioning stops at the device owner step | The headset has an account or another management app | Factory reset the headset and provision it again. Resetting erases the headset. |
| The card stays In Progress or provisioning stops with a generic error | The headset cannot reach Nomid over Wi-Fi | Check the network name, security and password, and the network requirements. Network preflight, in the Troubleshooting tab of Nomid Ops, tests from the computer whether the network reaches the Nomid and Android services. |
| The OS update fails on a PICO Neo 3 | The battery is below 40%, or the cable disconnected while the headset restarted | Charge the headset, keep it connected and try again. On other models, clear Enable OS update. |
| The headset is active but reports an old policy | It has not synced since the change | Connect it to Wi-Fi and wait for it to sync. The device's Policy tab in Devices shows the policy and version it reported. |
If provisioning still fails, keep the error message and the log from the session console, and contact support@nomidmdm.com before you reset the headset again.
Remove a headset from Nomid
- To manage the headset with another VR/Pico policy, use Change policy on its device page, as described in Devices. It does not need to be provisioned again.
- To take the headset out of management, use Uninstall Nomid in Nomid Ops while it is connected, when your access allows it, or factory reset it. The VR templates block factory reset on the headset, so set Factory reset to Allowed in the policy's security settings first if you plan to reset it from the headset's menu.
- A reset erases everything on the headset. To use it with Nomid again, repeat steps 3 and 4.